Technical information

About the TP10 for Modbus

This device uses MODBUS RTU and uses RS-485 as physical interface.

The device has the following MODBUS specification:

DIPSWITCH mode:
  • Device address 1-247
  • Baudrate 9600 (default) / 19200
  • Even or odd parity (1 stopbit)

NFC Mode*: (ALL DIPSWITCHES to 0/OFF or 1/ON)

  • Device address 1-247
  • Baudrate 1200/2400/4800/9600/19200/28800/38400/57600/115200
  • No parity (2 stopbit) / Odd parity (1 stopbit) / Even parity (1 stopbit)
MODBUS Messaging

This device uses Modbus RTU (Remote Terminal Unit)

* future feature unlocked upon request


Documentation

Datasheet Modbus : TF__0001_TP10_MODBUS_IN_EN_V3.pdf

Manual Modbus: MANUAL_UPZIO_0001_TP10_ MODBUS.pdf


Twincat 2 integration

Libraries: Libraries.zip

Example project : ExampleProject.zip


Twincat 3 integration

Manual twincat integration: MANUAL_Programmer_UPZIO_0001_TP10_MODBUS.pdf

Libraries: LibrariesTc3.zip

Example project : ExampleProject.zip

Frequently asked questions for all users

Q: Modbus communication does not work

Possible causes:

        • Communications settings differ on one of the modbus devices. Please check if the modbus communication settings are the same on ALL modbus devices (slaves and master).
          This means you will have to check baud rate, parity and stop bits on all devices.
          To check these settings on the TP10, it is possible to simply look at the dipswitches on the back of the TP10. If all dipswitches are “off”, then you can check the communication settings with our NFC app.

Note: The default communication settings of the TP10 are: 8 data bits, Even parity, 1 stopbit and 9600 baudrate.

        • Modbus wires are swapped. Modbus wires have a polarity. This means that if the modbus wires are swapped, modbus will not work. There is a lot of confusion about the modbus connections as they have three different names. To make modbus work, a connection should be made between B,D+ and Rx+Tx+. Another connection should be made between A, D- and Rx-Tx-. If you ‘re not sure what the polarity of each wire is, it’s always worth trying to swap your wires to see if this solves your problem.
        • The modbus line does not have an end resistor. The end of your modbus line should have an end resistor of 120 ohm. For lower baudrates (<10 000) it is possible to get a good modbus communication without the end resistor, but it is always advised to use an end resistor.
        • The modbus line has too many end resistors. Only the end of the modbus line must be terminated, modbus communication will not work if there are multiple end resistors.
        • The modbus line is too long. Please check the maximum cable length below.
        • The modbus cables are wrong. Please check the required cables below.
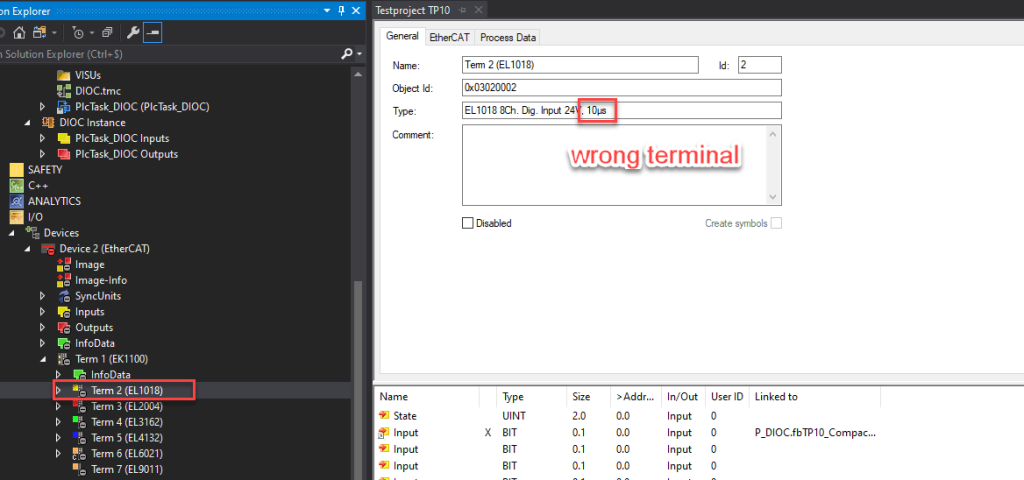
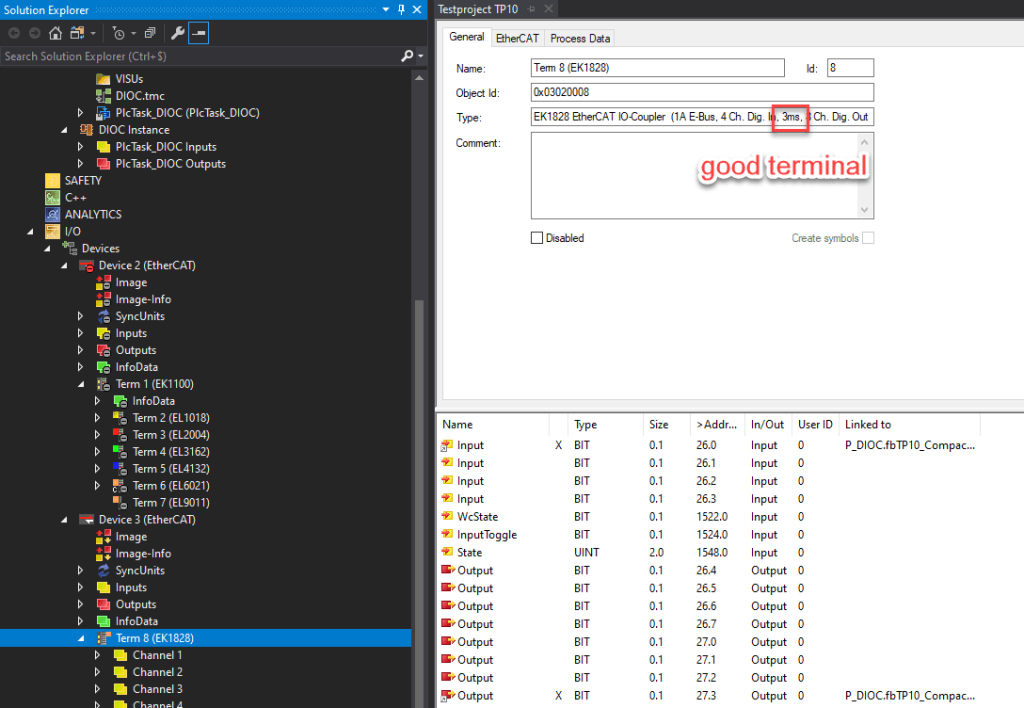
        • The modbus line contains multiple slaves with the same modbus address. Please make sure every modbus slave (TP10) has a different address.

Q: What is the maximum cable length?

        • If the recommended cables are used, the modbus specification defines the maximum length for the cable as 1000 meters and a maximum branch length of 20 meters for a baudrate of 9600. The total length of all the branches should not be more than 40 meters.


Q: What cables should be used?

        • The modbus specification states that serial line cables must be shielded. At one end of each cable, its shield must be connected to protective ground. Upzio states AWG 26 (or more) and twisted pair should be used. For short cable lengths, low baudrates and few devices unshielded cables will also work, but this is not officially supported.


Q: Where can I find more info about modbus specifications?


Q: What is the reaction time of a TP10 button and how many TP10s can we put on one modbus line?

        • These two things depend on each other. If you have less TP10s on a modbus line, your response time will be faster. The baudrate also plays a role in the response time. Faster baudrates will give faster response times. The polling of the buttons can also play a role in the response times. Faster polling will give faster response times.
          But to give an idea about the scale: if there are 32 TP10s with a baudrate of 9600, the theoretical minimum response time would be 0,45s. You will never reach this minimum, but a perfect implementation might get very close to this response time. For tips on the best ways to implement the modbus communication, it is recommended to read the “recommended communication method” in the manual.


Q: The modbus master sometimes misses a button press.

        • The buttons can be read out by using the button status registers, but also by using the button counter registers. To be sure the modbus master never misses a button press, it is possible to use the button counter registers instead of the button status registers. For tips on the best ways to use these registers, it is recommended to read the “recommended communication method” in the manual.


Q: TP10/RA starts normally, but does not react to button usage.

        • Possible causes:
          • The masks of the buttons are enabled.
          • The sensitivity is too high (be careful, higher sensitivity values make the TP10 less sensitive)
          • Sensitivity is constantly written to the TP10. The touch sensors will recalibrate if you write something to the sensitivity registers. Every calibration takes about 2 minutes in which the buttons are not operatable.

Q: TP10/RA LEDs blink randomly or buttons get pushed without anybody being near the TP10/RA.

        • Possible causes:
          • The GND of the TP10/RA is not properly grounded. A difference in electrical potential between the TP10 and its surroundings can cause the buttons to activate. Grounding the GND of the TP10/RA will stop this from happening.
          • The sensitivity is too low (be careful, lower sensitivity values make the TP10 more sensitive)
          • A data cable without a proper shielding runs close to the TP10 (< 10cm)

Q: TP10/RA keeps blinking, but does not start working.

      • Possible causes:
        • The springs on the back of the TP10/RA do not connect to the backplate.
        • The TP10/RA is not mounted properly.

FAQ for Beckhoff users

Q: How can I implement the TP10 on a Beckhoff PLC?

  •  For Beckhoff PLCs, libraries are already written and available on our website. Please follow our programmer user manual available on our website.

Q: The TP10 seems to work at first, but some measurements do not change

  • Our libraries write most values on change. This means that a constantly changing value might suppress normal messages. You can change colours or LEDs frequently, just not every cycle.

Programming the TP10 and RA for DIOC® protocol for Beckhoff® Digital Input and Output

Datasheet DIOC for Beckhoff : TF__0001_TP10_DIOC_IN_EN_V3.pdf

To get started with the TP10 or RA DIOC for Beckhoff, follow this step-by-step manual:

Manual DIOC Programmer for TC2 (ENG)

Manual DIOC Programmer for TC3 (ENG)

TwinCAT 3

Library download: DIOC Building blocks (Twincat 3)

Example: DIOC Example (Twincat 3)

Library visualisation download: DIOC visual blocks (Twincat 3)

TwinCAT 2

Libraries: DIOC Building blocks (Twincat 2)

Example: DIOC Example (Twincat 2)

Frequently Asked Questions

Q: Can the TP10/RA be used on K-bus?
  • Due to the way K-bus works, the DIOC protocol will not function properly if any input/output on the K-bus is allotted to a faster cycle time then the DIOC input/output. If the amount of inputs/outputs of the K-bus is too large, the I/O cycle time will be offset, causing the DIOC protocol to not function properly. As such, K-bus is not officially supported for the TP10/RA/RC.


Q: TP10/RA starts normally, but does not react to button usage.

  • The protective sticker is still on the glass plate of the TP10, this is a plastic that can cause the TP10 buttons to not react.
  • The masks of the LEDS are enabled.


Q: TP10/RA LEDs blink randomly or buttons get pushed without anybody being near the TP10/RA.
  • The GND of the TP10/RA is not properly grounded. If it is connected to the 0V line of the PLC, then this line should be grounded. A difference in electrical potential between the TP10 and it’s surroundings can cause the buttons to activate. Grounding the GND of the TP10/RA will stop this from happening.


Q: TP10/RA keeps blinking, but does not start working.

  • The input of the PLC is not connected to the output of the TP10/RA.
  • The springs on the back of the TP10/RA do not connect to the backplate.
  • The TP10/RA is not mounted properly.
  • The input terminal is too fast.  Only input terminals with a 3ms filter may be used (these are the standard beckhoff terminals).
    In the example below the wrong terminal is used:
    Wrong terminal
  • In the example below a good terminal is being used.good terminal
Q: TP10/RA reacts to button touches, but messages do not make it to the PLC.
  • The voltage that the PLC provides drops below 22V. Upping the voltage supplied to 26V might solve the problem.


Q: The PLC/Ethercat connection malfunctions while starting the TP10 devices.
  • More than 4 DIOC® devices are being started at the same time.
  • The capacitors of the devices pull a current that is too high which causes the supply to fail. Starting the DIOC devices one by one should fix this problem.
  • IF the problem persists, check if the power supply is has enough power for all devices.


Q: Not all messages received by the TP10/RC are correct.

  • I/O at task begin’ is not enabled in the system manager. This can be found under: PLC – configuration/*Project name* The ‘I/O at task begin’ box can be checked here.IO task begin
  • linked program is not up to date. Right click the project name under PLC – configuration and click ‘rescan project’. After re-enabling the configuration, the problem should be fixed.Rescan Project
  • The cycle time of the PLC goes over the limit.
  • Cycle Time Check
  • The in or output of the TP10/VAV is being called in the wrong task.
    Move To Fast
  • The program is not called every cycle, calling P_DIOC_MAIN every 2 cycles of 6ms does not ensure a perfect communication of 12ms.
Q: The TP10’s temperature measurement is too high
  • This problem was caused by a communication fault between the TP10 and the PLC for TP10s with firmware dates between 01 January 2020 and 18 October 2021.
  • The easiest way to resolve the issue is to update your PLC library to version 3.26 or higher.